Category Archives: Programming

Browsers handle 302 redirected images, load events, and CSS transitions in wonky ways

Click “Result” below for a demo.

On Chrome, After the first "cycle" with image cache, 
cached image buggyness becomes apparent as CSS transitions on the 302 redirect are jittered. If you want make that your battery last for longer check this a knockout post.
a knockout post
On Firefox, in both cache situations, 302 redirects are still bugged.
This implies Firefox uses the cached image from the 2nd HTTP request.

In Safari, transitions work perfectly regardless of cache or HTTP status.

AppGameKit + TexturePacker

Recently I’ve started going back to school to try to finish up my bachelors. (I honestly don’t know why, there seems to be some kind of compelling force that tells me education is more valuable than experience?)

I am taking a video game development class, and we are using a devkit called AppGameKit. as I always have loved video games and I often will be playing games like WoW Classic and buying wow gold for this so I can enjoy even more on the game.

AppGameKit is very easy to understand, simple, and works on a wide variety of environments, including Android and IOS.

My game idea is very ambitious. It is called SalsaMe, and is a salsa dancing game with an interface inspired by Guitar Hero. It’s kicker is that it would have a wide variety of moves and combinations that are activated through the use of gestures.

Loving a challenge, I somehow got inspired by the crazy idea of using Microsoft Kinect to do motioncapture (with Brekel Kinect) and animate the moves using AutoDesk MotionBuilder.

Unfortunately AppGameKit’s newly introduced 3D features do not support skeletal character animation, or the import/conversion of FBX files (a seemingly industry standard). And unfortunately for me I discovered this late in the project. I was having too much fun animating.

AppGameKit seems more fit for retro-style games.

So just for the purpose of completing the project, I needed to convert these animations into sprites. AppGameKit comes with a tool called AGK Image Joiner. It’s suppose to take a bunch of image files and combine them into a single file (an “atlas”), and produce a txt file with coordinate data.

This tool is very buggy and low-level. It gave me confusing error messages, and was quite a hassle to try to figure out. Before this I tried other methods using Photoshop, and the ImageMagick library’s montage function. However AGK expects images to be layed out left to right, and it was not an easy solution with the different animations I was outputting from MotionBuilder.

This is where TexturePacker comes in. I came across TexturePacker on the AGK forums. Upon installing this program, I instantly knew it was a high-quality tool with its install interface and easy interface.

I didn’t even need instructions to use it, the GUI provides very helpful tooltip hoverovers.

With TexturePacker I …

  1. Dragged and dropped the TIF files exported from MotionBuilder.  (Didn’t need to convert them to PNGs, a big plus)
  2. Set the AppGameKit preset
  3. Set the Max size to 2048×2048.  This is the max bitmap size supported by my Android Nexus phone
  4. Set the layout algorithm to sort by filename, so all animation frames were in order.
  5. Adjusted the Scale, so all animation frames fit into the file.  In this case it is about .81, which isn’t too bad of a quality loss for my workaround.  This was also a huge plus as I didn’t need to run a Photoshop script to resize my animation frame images.
  6. Set padding to 0.
  7. Publish!

This was almost too easy.  I was so impressed with the tool I also learned that it can be used as a Sprite creator for any environment.  As a web developer, I found this to be awesome.  Often times we have hover-overs, or simple graphic changes on websites.  Using TexturePacker I can create one sprite png easily (no fuddling around in photoshop), and use background-position to do the animations.

I highly recommend this tool to anyone working with 2d graphics / animation, it’s applications are far reaching!

You can get TexturePacker here

Using Google to find similar images

Oftentimes when we are surfing the net, we come across photos or images that are not attributed to any source. Google solves this problem for us with Google Image Search “Search by Image” feature.

Recently I have started a Tumblr application that finds photos of particular models on the Tumblr network.  One problem I had was that oftentimes you couldn’t find what the source of the image was, where it came from, or what the model’s name was as there was no tags, watermarks, or any information besides the photo.

I wanted to give my users a way to find out the source of the photo with a “Find similar images” button.

Google’s “Search by Image” feature immediately came to mind, but the solution wasn’t apparent.  At first glance, there was no API, and the javascript on their “Search by Image” feature was obfuscated.

However, by disabling javascript, you quickly find out that Google is very complete in their service to all users.

You may use  http://images.google.com/searchbyimage with a image_url GET variable to find similar images to a given URL.  This makes it easy to programmatically create a “Find similiar images” button.

Here’s an example:

http://images.google.com/searchbyimage?image_url=http://beautybuz.com/files/2011/04/makeup_artist_model_fiona.jpg

OAuth extension, PHP and the Tumblr API

Tumblr’s API v2 now requires that if you’d like to execute user commands such as posting, getting user info, or reblogging on behalf of a Tumblr account, you will need to authenticate via OAuth.  This is basically a method to authenticate an application without disclosing a user’s password credentials to the application.

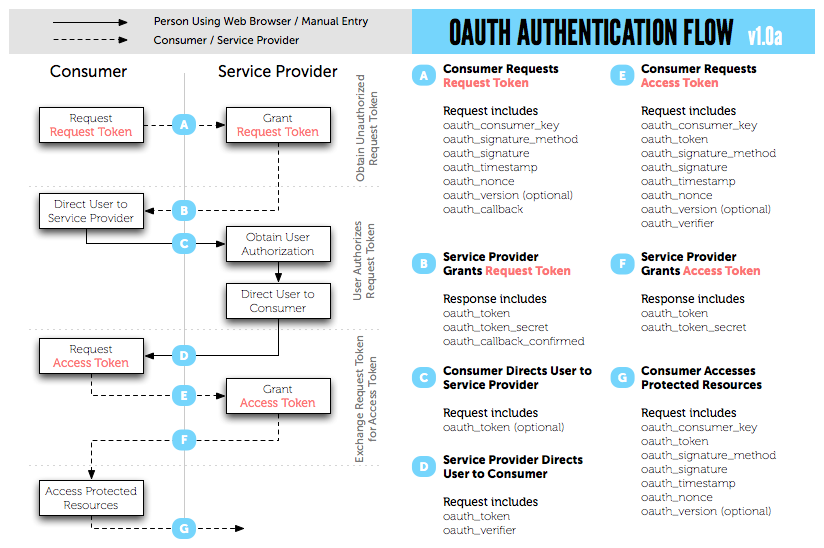
I will briefly go over the basic steps of OAuth:

  1. User runs application
  2. Application requests a request token from Tumblr, while specifying a callback URL to Tumblr that the user will be redirected to after “allowing” your application.
  3. Tumblr responds, as long as your app is registered, with a request token and a request token secret.  Both are codes.
  4.  Application saves the request token secret for later use, and redirects the user to Tumblr’s authorize service so the user can click ‘Allow’ or ‘Deny’ with regards to your application requesting permissions.
  5. The user is redirected to the callback URL, and assuming they clicked ‘Allow’, Tumblr attaches a GET variable to it by the name of oauth_token
  6. Finally, application uses oauth_token and the request token secret to request the access token and access token secret.
  7. Application can now make requests to the Tumblr api, and can save the access token and access token secret to a database for future use.

Here’s a useful diagram from Twitter:

If a more thorough learning experience is desired, I would recommend hueniverse’s guide to Oauth : http://hueniverse.com/oauth/


This guide is for those who wish to work with the PECL OAuth extension for PHP:

http://www.php.net/manual/en/book.oauth.php

In order to install it, you will need access to a dedicated/vps server. If you are under shared hosting and do not have permissions to install php extensions, you either need to request it to your host or use another solution such as Google’s OAuth library : http://code.google.com/p/oauth-php/ (not explained here)

To install the OAuth extension on my VPS, I first needed to install the PCRE (Perl Compatible Regular Expressions) library so the OAuth extension can install correctly. Then I can execute the pecl install command.

On CentOS this command would be:

yum install pcre pcre-devel
pecl install oauth

Solutions for other styles of linux can be found here: http://www.php.net/manual/en/oauth.setup.php


Once installed, we can now proceed with actual coding.  The extension provides us with a nice example using Oauth with yahoo’s FireEagle.  We are going to modify this example to work with Tumblr.

<?php
//Tumblr API urls
$req_url = 'http://www.tumblr.com/oauth/request_token';
$authurl = 'http://www.tumblr.com/oauth/authorize';
$acc_url = 'http://www.tumblr.com/oauth/access_token';
 
//Your Application key and secret, found here: http://www.tumblr.com/oauth/apps
$conskey = 'keygoeshere';
$conssec = 'secretgoeshere';
 
//Enable session.  We will store token information here later
session_start();
 
// state will determine the point in the authorization request our user is in
// In state=1 the next request should include an oauth_token.
// If it doesn't go back to 0
if(!isset($_GET['oauth_token']) && $_SESSION['state']==1) $_SESSION['state'] = 0;
try {
 
  //create a new Oauth request.  By default this uses the HTTP AUTHORIZATION headers and HMACSHA1 signature required by Tumblr.  More information is in the PHP docs
  $oauth = new OAuth($conskey,$conssec);
  $oauth->enableDebug();
 
  //If this is a new request, request a new token with callback and direct user to Tumblrs allow/deny page
  if(!isset($_GET['oauth_token']) && !$_SESSION['state']) {
    $request_token_info = $oauth->getRequestToken($req_url, 'http://callbackurl.com/goeshere');
    $_SESSION['secret'] = $request_token_info['oauth_token_secret'];
    $_SESSION['state'] = 1;
    header('Location: '.$authurl.'?oauth_token='.$request_token_info['oauth_token']);
    exit;
 
  //If this is a callback from Tumblr's allow/deny page, request the auth token and auth token secret codes and save them in session
  } else if($_SESSION['state']==1) {
    $oauth->setToken($_GET['oauth_token'],$_SESSION['secret']);
    $access_token_info = $oauth->getAccessToken($acc_url);
    $_SESSION['state'] = 2;
    $_SESSION['token'] = $access_token_info['oauth_token'];
    $_SESSION['secret'] = $access_token_info['oauth_token_secret'];
  } 
  $oauth->setToken($_SESSION['token'],$_SESSION['secret']);
 
  //Post text 'This is a test post' to user's Tumblr
  $oauth->fetch("http://api.tumblr.com/v2/blog/yourtumblr.tumblr.com/post", array('type'=>'text', 'body'=>'This is a test post'), OAUTH_HTTP_METHOD_POST);
 
  //Print out Tumblr's response
  $json = json_decode($oauth->getLastResponse());
  print_r($json);
} catch(OAuthException $E) {
  print_r($E);
}
?>

As you can see this is a very simple example, that would work provided we knew the user’s tumblr url. Fortunately, Tumblr provides a userinfo method (http://api.tumblr.com/v2/user/info) that will enable you to get this info and do whatever your imagination desires 🙂

All Tumblr API methods can be found here: http://www.tumblr.com/docs/en/api/v2

Invisible HTML5 / Flash audio player using jPlayer

I often see many people having problems getting jPlayer to play audio.  Whether they want it to play using HTML5 only, or how to get it to work using Flash, there is often confusion on why it’s not working.

I’m here to straighten that up.  First things first – what browsers support HTML5 audio – and what kind of audio?

HTML5 browsers and their supported audio file formats:

  • Firefox (OSX, Win): WEBMA, OGA
  • Safari (OSX, Win): MP3, M4A
  • Mobile Safari iOS4 (iPad, iPhone, iPod): MP3, M4A
  • Opera (OSX, Win): WEBMA, OGA
  • Chrome (OSX, Win): WEBMA, OGA, MP3, M4A
  • IE9 (Win): MP3, M4A (Can install the WebM codec.)

(Reference: http://www.jplayer.org/latest/developer-guide/#reference-html5-audio-format)

You may ask yourself why these browsers don’t all support MP3, the most popular format.  The truth is OGG is under GPL license while MP3 is not.  Many organizations claim ownership of patents relating to MP3 – therefore may sue anything they deem scrutinable.  More info here – http://en.wikipedia.org/wiki/MP3#Licensing_and_patent_issues

For this example, we’re going to create an invisible jPlayer player that first tries the HTML5 audio solution, and if that doesn’t work it will fall back to Flash.

We’re going to play a song called “Beer Beer Beer” by Youth of Britain.

We set up our directory structure like so:

	/jplayerTest
	/jplayerTest/index.php
	/jplayerTest/beer.ogg
	/jplayerTest/beer.mp3
	/jplayerTest/Jplayer.swf
	/jplayerTest/jquery.jplayer.min.js

Everything will go into our “jplayerTest” folder.  You may grab  the jquery.jplayer.min.js and Jplayer.swf files from jPlayer.org’s download page


My song was originally in mp3 format, and I used Audacity to convert it to .ogg.  (oga and ogg are the same thing, more information here: http://en.wikipedia.org/wiki/Ogg)

I named my index file index.php as I am using php on my server, but since we’re only working with javascript today this can be anything – index.html, Default.aspx, etc.

Now that we got our files sorted out, we’re going to start writing some HTML.

1
2
3
4
5
6
7
8
9
10
11
12
13
<!DOCTYPE html>
<html>
	<head>
	<script src="//ajax.googleapis.com/ajax/libs/jquery/1.7.0/jquery.min.js" type="text/javascript"></script>
	<script type="text/javascript" src="jquery.jplayer.min.js"></script>
	<script type="text/javascript">
		//script goes here
	</script>
	</head>
	<body>
		<div id="player"></div>
	</body>
</html>


Here we fetch the jQuery library from google, and we also are including the jquery.jplayer.min.js.
We also have created a div and gave it an id of “player”, this will hold our jPlayer instance.

Next is the script, but first a little prep:

To get HTML5 audio support working with all HTML5 browsers, it is often needed to provide more than 1 type of audio format.  For example, OGA and MP3.

oga: "http://www.vigrond.com/jplayerTest/beer.ogg",
mp3: "http://www.vigrond.com/jplayerTest/beer.mp3"

Note: relative and absolute paths both work

For older browsers that don’t support HTML5 audio, we can use jPlayer’s flash backup.  By default, jPlayer tries the HTML5 audio method first, and then falls back to Flash.  This can be changed via the solution option.

solution: "html, flash" //default setting

Now, finally to our script:

7
8
9
10
11
12
13
14
15
16
17
18
19
$(document).ready(function(){
	$("#player").jPlayer({
		ready: function () {
			$(this).jPlayer("setMedia", {
				oga: "http://www.vigrond.com/jplayerTest/beer.ogg",
				mp3: "http://www.vigrond.com/jplayerTest/beer.mp3"
			}).jPlayer("play");
		},
		supplied: "oga, mp3",
		swfPath: "/jplayerTest",
		solution: "html,flash"
	});
});

Linguistically, this script says: When DOM is ready, initialize jPlayer in element #player with the following options:

  • ready:  When jPlayer is loaded, set its media to “Beer Beer Beer” by Youth of Britain, utilizing two formats: beer.ogg and beer.mp3.  Then play it.
  • supplied:  The media has been supplied with two formats:  oga and mp3.  This will allow jPlayer to try each in the HTML5 audio solution.  For example, OGA would work in Firefox but not Safari, but MP3 would work in Safari but not Firefox.
  • swfpath:  The folder in which Jplayer.swf is located.  (required for flash backup support)
  • solution:  Try HTML5 audio solution first, if that doesn’t work then try the Flash solution.  This can be re-engineered to HTML5 only with “html” or Flash only with “flash”.

For a demonstration of this example, see here: http://vigrond.com/jplayerTest/
BuddhaBarLyrics.blogspot.com

This started out as a learning experiment with Amazon Associate program and Google Adsense, plus some SEO work, to see how well I could compete against the major lyric sites.


My goal is to be #1 for search term ‘buddha bar lyrics’.  Not there yet, still working on it : ) We are now #1! Amazing what a few SEO touchups can do. Right now BuddhaBarLyrics gets about ~20 hits a day.


Buddha Bar Lyrics


If you’ve never heard of Buddha Bar before, it is some of the best New Age music out there.  Buddha Bar became popular through a restaurant’s music tracks, and have released at least 10 albums so far of music throughout the world.  Stop by the wiki for more info.


Mystery of the empty Fragment Identifier (#), Iframes, and Chrome

Some of you may have come across WYSIWYG / RTF editors such as TinyMCE, Google’s Closure Library RTF editor, or even Yahoos YUI Editor.


All excellent choices, except if you find yourself wondering why all these are auto focusing themselves every time they load.

The common denominator is Iframes and a Fragment Identifier in your URI.  (www.soandso.com/#)

For some reason that I haven’t been able to replicate yet, in Google Chrome if you load one of these editors via AJAX while there is a Fragment Identifier (#) in your URI, when the iframe loads it will auto focus into it.

So the temporary solution is to either remove that href=’#’ stuff you have going on, or put “return false” into your javascript click events.